Saturday, September 17, 2011

The Boomerang Scarf at Blue Mountain Lake Fiber Festival

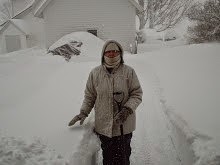
Sharon's preferred, asymetrical  style wrap


Note: the scarf in the pic is an early version.  When you follow
the directions below, you will wind up with a longer,  narrower, and
easier to wrap, scarf.  You'll see, and you'll like it.
I had a great time today at the Adirondack Museum in Blue Mountain Lake.  It was Fiber Festival day, and the yarn bombers had visited the museum!  There were knitting and crocheting (and felting, quilting, rug hooking, and on and on...) explosions all over the place.

I brought the boomerang to share with the other knitters, and I just enjoyed the knitting and sharing and meeting people.

The Boomerang scarf is an easy, warm and stylish scarf.  It is all garter stitch, so it wraps like a dream, and wants to hold onto your coat!  Knit it in wool, or a wool-silk blend.  Wool-alpaca would also work, and the alpaca will lend its drapiness as well.  Handspun yarn works well with this pattern.  Gauge is not critical.  Make it as small, or as big as you want (or as your ball of yarn dictates.)   You can knit this at bigger gauges for a softer, less structured knit.  It will 'collapse' on your neck better at bigger gauge, and it will 'stand up' better at the tighter gauges.


Let me know how yours turns out.

Directions:


Boomerang Scarf

Yarn-  About 200 yards
Needles to knit at about 5 stitches to the inch ( for knitting worsted weight yarn) or 6 stitches to the inch ( for sport weight yarn). 

Cast on 2 stitches.

Row 1 (and all odd rows)       Yarn Over, then knit to the end of the row.  (increase of
                                         one stitch)
Row 2                               YO, knit to end of row. (one stitch increased)
Row 4                               Same as row 2
Row 6                               Bind off 4 stitches, knit to end of row.

Repeat these 6 rows until you have used about half of your yarn.

Then:

Row 1 (and all odd rows)       YO, K1, YO, knit to end of row (2 stitches increased)
Row 2, 4, and 6 as before.

When 15 or 20 yards of yarn remain, end row 5.

Then:

Row 1      Bind off 4, knit 5, turn.
Row 2      K 5, turn
Row 3      K 6, turn
Row 4      K 6, turn
Row 5      K 7, turn
Row 6      K 7, turn

Repeat these 6 rows to make sawteeth and bind off the open stitches.  If you run short of yarn before sawteeth are done, bind off the rest of the open stitches without making sawteeth.
                          

Wednesday, September 14, 2011

Knitting in Denver! AND another shrug pattern!

I gave the LK 140 to myy DDIL, who is not yet a machine knitter, a couple years ago.  (Give her time.) I was visiting her (and the new, 4th, baby) to help out for a bit, and I dug out the machine to entertain myself.

DDIL plans to use a Moby wrap with the new baby, Jack.  Her problem is that a sweater will not filt OVER a Moby and a baby.  Our solution started with Sensations Kashmiri from Joann's. 
 
I started with  the free Lion Brand pattern (http://www.lionbrand.com/patterns/90687AD.html?noImages=) for the simple shrug- I ran a gauge sample and got 4.5 s x 6 r/ inch,and translated the pattern for the machine, using the pattern dimensions given in the pattern. The 34 inch wide panel was too wide for the machine, so made it up in two half-width panels, which I joined by raveling the edge stitch on each piece and drawing 2 loops through two loops. (I set this up by leaving one needle out of work before the last needle, on the left side of piece one, and on the right side of piece 2.  This makes the loops you will get by ravelling down the edge stitch a bit bigger. ) This put the mock braid detail up the back of the shrug. I knit the panels with open caston, and later, I picked up the open stitches and hand knit 2x2 rib on top and bottom of the joined panels. I used the Joann’s sensations Kashmiri, and i must say this lively 10-ply wool worked up great, and the machine loved it. (fYI, takes less than 4 full skeins, and kashmiri is 284 yards/100 gm)


My back panel joins make a nice openwork 'braid'.  Who would not want one of these?

The new Mom likes her shrug!


Okay, let's review.
You will make two panels, each one 17 inches wide by 34 inches long. Do a gauge sample to get your stitches for 17 inches and your rows for 34 inches.   On panel #1, leave a needle out of work inside of the left edge stitch- and on panel #2, leave that needle out of work inside of the right edge stitch.  (You could also just move the edge stitch over, but the extra width caused by the ravelled edge stitch more than made up for the loss of one stitch in the width. )    Cast on with waste yarn, and when you start the first garment yarn row, do not use a closed cast on with your main yarn- just knit.  When it is the right length, take it off on waste yarn.  I collect the open top stitches and the open bottom stitches on a couple of circular needles, leaving off the edge stitch that you are going to ravel, so that you can run it down, a couple rows at a time, while you join up the panels.  When the panels are joined you have this great looking 34" x 34" square.  Now knit 2 inches of 2x2 rib on the top edge, and on the botttom edge.  I used a size 4 needle, shooting for a rib to take full advantage of this yarn's springiness.  When you cast off these ribs, you have a square that is 34 " wide, and 38" long.  Fold it in half lengthwise- sew up the sides starting from the ribbing, stopping about 8 inches from the top fold.  
To wear, put your arms through the armholes, and arrange the ribbing a a shawl collar on your neck, down the front and around the bottom/back of the shrug.  


There WAS other knitting in Denver, but it's still on needles.  Airplane knitting.